Friday, July 15, 2011

How To Maintain Healthy Hair

Everyone wants storng, healthy, shiny hair. Here are some tips how.

1. Limit the amount of harsh chemicals and products exposed to your hair. One major thing to stay away from is sulfates. Sodium lauryl sulfate is one of the first ingredients listed on many shampoos. sulfates can strip the hair of importnat nutrients, and can iinhibit growth of hair.
2. Even if you are using a sulfate -free shampoo, it is important not to wash your hair everyday. Although people think that clean is better, your hair produces immportant oils at the root and those oils need to have the chance to migrate down towards the tips. Instead, wash your hair every other or every two days. Days that you don't wash your hair, put it up in a shower cap so that it doesnt get wet. If you think that your hair is too oily not to wash every day, that fight the urge to shampoo it by using a dry shampoo.
3. Limit the amount of heat your hair is exposed to. Personally, I think that this is by far the hardest rule to follow. Like most people, I feel the urge to always straighten or curl my hair. But the level of heat that most heating tools give off is extremely harsh on the hair. Instead, try to find heatless styles to limit the amount of heat. Simple buns and braids are a fast and easy way to fix a bad hair day, without damaging the hair too much.
4. Protect your hair! If you are going to use a heating tool, you should deffinately use a heat protectant!! This counts for all flat irons, curling irons, blow dryer, hot rollers....any hair tool that emits heat needs to be protedcted agains by a heat protectant. And never use a hot tool on wet hair! Hair must be completely dry before beign styled with heat, except for a blow dyer of course.
5. Get your hair trimmed regularly. This is another rule that I find ard to follow, but hair wont be healthy with split ends. Although the rumor that hair that has split ends wotn grow is false, your hair will only keep splitting farther up the hair shaft.By not getting hair tirmeed regularly your goign to end up needing to cut more off when you do get it cut.

Recommended Products:
L'oreal Everstrong Sulfate Free Shampoo and Conditioner
Tresemme Heat Tamer Spray
Redken Satinwear Blowdry Lotion


Saturday, July 9, 2011

How To Wear Bright, Colorful Eyeshadow

The basic rule to follow is to only play up one feature at once. If you are going to go heavy, or bright, with eye makeup then keep everything else relatively simple. You could either do a bright eyeshadow on the lid, or a bright eye liner as a pop of color on the lower water line. 
If you wear two, or more, bright colors on the lid make sure that the colors coordinate nicely together. Pat the colors together so that there isn't an obvious line of where each color ends, but don't over blend the colors because it'll become a muddy color. To ensure that the colorful look doesn't only make a statement, but also remains flattering, add a thin line of black liquid or gel liner to the upper lash line.


To do a pop of color on the water line, keep the eyeshadow on the lid pretty simple and natural. Use soft beiges, browns, and other earthy toned colors. Then, add a bright colorful eyeliner to the lower waterline. To set the liner put a similar color eyeshadow over the liner, then smudge the eyeshadow a little bit under the water line. 


With either look, keep the rest of the makeup simple. Go for a sheer blush color, to give a wash of color without making it the focus of the look. Use a sheer lip balm or gloss to add a little bit of color and balance the look, without overpowering the eyes. 


Recommended Products: 
Physicians Formula Shimmer Strips Custom Eye Enhancing Shadow & Liner, Eye Candy Collection (for your eye color) 
Urban Decay 24/7 Glide On Pencil

Sunday, July 3, 2011

Patriotic Nail Design For the 4th of July

Products you will need:
Red Nail Polish
Blue Nail Polish
White Nail Polish
Thin Brush White Nail Polish
Toothpick

Start with polish free, filed nails
1. Apply  abase coat of blue to you pinky and ring finger on your left hand, and red nail polish to the middle, pointer, and thumb. On the right hand apply blue to the thumb and pointer finger, and apply red to the middle, ring, and pinky finger. 
2. Once the base coats of blue and red are dry, Use the thin brush white polish, to apply two stripes to the nails with the red polish. 
3. Put a drop of the white polish onto an index card, and using the toothpick pick up some of the polish. Then use the toothpick as a dotting tool to make white dots on the blue nails. 
4. If you want, you can add a top coat to all of the nails. Make sure that they are completely dry first so you don't smudge the design. 


Friday, July 1, 2011

Product Rave: Physicians Formula Green Concealer Stick

This product is amazing! It hides facial redness amazingly well! It can be used to cover blemishes as well as just all over facial redness. How I usually use it is after I wash my face and have moisturized, I let the moisturizer sink in for a few minutes. After that, I apply the concealer on each cheek with a few stripes. Then I blend it in. The green cancels out the redness. My face is left looking a little bit pale, but not red anymore. After that I follow up with either foundation if I want heavy coverage, or tinted moisturizer or powder for lighter coverage. 
$5.45
This is the perfect product to cover facial redness; it's also the one of the cheapest products that claims to cover redness. I highly recommend it!

Wednesday, June 29, 2011

Sigma Makeup Brushes: Complete Brush Kit review

I’v had my Sigma brushes for seven months now, and they are still in great condition. I got the Complete Kit With Brush Roll. Considering I never really owned many brushes before, I thought buying the complete kit would be a good base to start my collection. The kit comes with practically every brush you need to apply makeup. 
The Brushes:
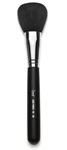
F30: Large Powder Brush; natural bristles. I was the least excited about receiving this brush, because it seemed pretty standard. However, it’s one of my favorites in the set. It is perfect for applying a light, build able coverage of powder foundation, or for a light dusting to set foundation. Its also ideal for applying a light coating of bronzer. This brush is really soft and makes applying makeup even more enjoyable. Each time I wash it, it becomes even softer. The F30 brush does not have a problem with losing hairs
F50: Duo Fibre Brush; synthetic and natural bristles. I was really excited to get this brush, and i have not been disappointed. It is really versatile and has many uses. I have use this brush for liquid foundation or tinted moisturizer, as well as for blush. It generally is good for applying a light layer of product. I have not a had a major shedding problem with this brush, but it occasionally sheds a hair when being washed. The only other problem i sometimes have with this brush is that it is hard to use for liquid products more than twice before being washed. However, this would be true of ay other duo fibre brush as well.
F40: Large Angled Contour; natural bristles. This brush makes applying blush and bronzer really easy. It is the perfect shape for contouring cheek bones with matte bronzers. This brush does not have a problem with shedding hairs. 
F60: Foundation; synthetic bristles. This is a typical foundation brush, ideal for applying liquid foundations. I was a little surprised when I first received this brush because it seemed smaller then I expected. However, after using it I've noticed that because of the smaller size it is easier to control where the product is applied. I have noticed that this brush is really hard to wash and takes a while to remove all of the product from the bristles, but this would happen with other foundation brushes as well. 
F70: Concealer; synthetic bristles. This brush is like a mini version of the F60 foundation. This brush is perfect for covering blemishes or other imperfections. I do not love this brush, because after applying concealer with is I still feel the need to blend the concealer in with my finger.
E40: Tapered Blending; natural bristles. This is one of my favorite brushes from this set. I like using it for simple, soft looks to just apply a light even layer of color. It is also ideal for applying, and blending out crease colors. This brush sheds sometimes while being washed, but doesn't have a major shedding problem.
E55: Eye Shading; natural bristles. This brush is great for packing on eyeshadow onto the lid. Although I really like this brush I don't think this type of brush is worth spending the money on because you could get the same  type of brush for cheaper. However, it is a great addition to the set, but if you are buying the brushes individually I would say to skip this brush and get a cheaper eye shading brush.
E60: Large Shader; natural bristles. This brush is great for applying pigments or shadows when used wet. It is also great for blending out ream shadows and bases. I usually do not use this brush with cream products because I use my fingers to blend out cream eye products more often. However, it is great when I use pigments wet. 
E70: Medium Angled Shading; natural bristles. To be honest, I do not use this brush very often. It is great for applying a light wash of color. It is also great for applying an under brown bone highlight. 
E30: Pencil; natural bristles. I love this brush! It is great for applying a highlight color on the inner corner of the eye. It is also good for smudging darker shadow under the eye for a smudged out liner look. It is also good for applying a thick crease color, and then blending it out with a blending brush. 
E65: Small Angle; synthetic bristles. This brush can be used for applying gel liner, or filling in eyebrows. Personally, I use it for filling in eyebrows because I prefer using a pointed brush gel liner. I really like this brush for eyebrows though. 
E05: Eyeliner; synthetic bristles. This brush is perfect for applying gel and liquid liners. It can make a straight liner across the upper lash liner,a s well as able to wing out the line. 
E25: Blending; natural bristles. This brush doesn't come in the kit but the travel size one came as a a free gift with my sigma purchase. Although I wasn't expecting to get it, it turned out to be one of my favorites. This brush can be used on the flat side to pack on eyeshadow. It can be turned on the tips for applying crease color, and then put horizontal to blend out the edges of the crease. 

Monday, June 27, 2011

Stop the Makeup Meltdown

Summer heat is almost inevitable, but what you can avoid is the smeared mascara, and blotchy foundation. Here are some tips to avoid a makeup meltdown through the summer heat. 


1. Less is more; to avoid makeup being smudged and ruined throughout the day, put less on to begin with. Instead of caking on the foundation, concealer and powder, opt for a tinted moisturizer or light coverage foundation and add concealer in spots that need a little bit extra coverage.


2. Cream blush/cheek stains; the cream and liquid powders blend more into the skin, rather that the usual powder blush, leaving a more natural flushed look. The powders and creams are also more likely to stay on through the hot, summer weather. 


3. Sheer lip balms; bold, bright colored lipsticks are always a summer trend, but tend to accentuate every fault of chapped lips. Instead, opt for a sheer, lip balm that will help to treat your lips, and add a hint of color. 


4. Simple eyes; instead of layering on different hues and shades to create a smokey look, opt for a simpler look. Start with a cream shadow base in a shimmery color all over the lid. Add a similar shade on top of the lid to lock it in place and ensure the staying power. Add a matte neutral color a few shades darker than your skin tone to the crease. Apply a matt highlight, to avoid looking too shimmery, a few shades lighter than your skin tone to the brow bone. Apply the same color to the inner corner of your eye. Finish off by curling your eye lashes and applying a few coats of a water proof mascara. 


Recommended Products:
Covergirl CG Smoothers Tinted Moisturizer 
$7.77
Benefit Benetint Lip and Cheek Stain
$28
Mac Paint Pot in Bare Study
$16.50
Covergirl Lashblast Waterproof
$7.79