Friday, December 9, 2011

Style Icon: Carrie Bradshaw

I try and live by thinking I will try any trend at least once, and the true inspiration for this is Carrie Bradshaw. Carrie rocked everything from mixed patterns, to two different colored shoes. However over the top and ridiculous Carrie's style was, she still always looked put together and stunning. 

Some of my favorite Carrie looks:
Carrie looks completely elegance in her simple black dress, classic curls, boots, and soon to be staple oversized glower brooch. Besides for the cigarette, Carrie has the complete look down. Carrie is the queen of not looking as though she tried to hard, even with the  crazy accessories. 

While I can't say the same for Sammantha, the matching shiny blue tank top and pants is not cutting it, I personally love  the two different colored Manolos on Carrie. It might not be the most wearable trend, Carrie  pulls it off  by leaving the rest of her outfit  simple and frilly. 

Carrie looks fierce in her runway debut, with sparkly underwear plus the structured royal blue cape with cheetah print backing. She may have fallen on the runway only moments later, but at least she had the courage to not only rock the outfit but get back up and keep walking. 

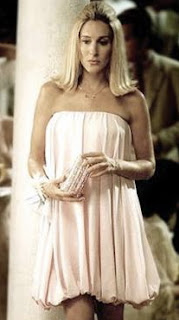
Carrie looks pretty in pink in her short, pink, bubble dress. The sleek straight hair helps to complete her totally cute look. The sparkly clutch only helps to balance the simplicity cuteness, and polished effect of this outfit. 

Carrie may have left the small screen, but she definitely did not lose her over the top style. Her beachy waves and golden glow are the perfect complement  to the white mini dress with the oversized flower on the shoulder. 


Sunday, December 4, 2011

Holiday Gift Guide

Here are my recommendations of what to buy as holiday presents this year.


For the Fragrance Fanatic:
Deluxe Fragrance Sampler For Her, from Sephora,.It is a collection of 12 samples of best selling fragrances, as well as a refillable fragrance atomizer. It also has a voucher for the gift recipient to bring to Sephora and choose the full size of their favorite fragrance after sampling all of them. For $50 this is a really great value and an amazing present!


For the Crazy Crafter:
A cute mini glue gun. I got my zebra print mini glue gun at Michael's this summer, and I can't find it on their website but hey have other really cute ones too. They're not too expensive, I think mine was about $10 or less, and really handy and adorable! Anyone who enjoys anything crafty would love this present. 

For the Product Hoarder:
Birchbox Subscription! I know personally I've been waiting all year to ask for this for the holidays! For anyone who loves constantly trying out new products this is the perfect gift! If you're not familiar with Birchbox its a subscription that you get and then each month you get a box with 5 deluxe samples, and the occasional full sized product. You can gift Birchbox for 12, 6, or 3 months. 

For the Polish Addict:
Seche Vite top coat is an amazing gift to give anyone who loves to paint their nails at home on a regular basis. It leaves a really professional finish to any polish, even cheaper ones. Also, it helps polish stay longer without chips, which is great for anyone who does designs because it keeps them on after all the effort put in! 
I also think that the Shades of Seasons nail polish sets that come out every year at CVS are great gift. Its really affordable, and a wide range of colors in the set. The colors are actually pretty unique and the polishes are a surprisingly good quality.


For the Makeup Lover:
Ok this last one I think anyone would love! The Naked Palette is by far my favorite makeup product I won. You can crete the most neutral looks to smokey dramatic looks. Definitely worth the price, and the hype was well deserved Now that the Naked Palette 2 was released this, hopefully, will be eaier to get hold of. If you can, definitely pick it up. 


OPI Excuse Moi! Review

OPI Excuse Moi!, from the muppets collection, is a red based polish with glitter. It has small refined silver glitters and then bigger glitters that are multi colored. One coat of the polish leaves a sheer red-pink with the glitter; two coats leaves an opaque red-pink with lots more of the glitter. It's a really pretty color for the holiday season!


The picture isn't showing the shimmer and sparkle as much, but it is a really pretty, very glittery red based pink, with mutli-colored glitters. 

Tuesday, November 8, 2011

Twilight Cover Nail Design

The Twilight Saga: Breaking Dawn Part One comes out on November 18th. To get ready for the movie, I decided to do a Twilight inspired nail design. On my left hand I put a different book cover design on each finger, and the release date of the movie on my thumb. On my right hand I decided to write out twilight over the different fingers, and again put the date on the thumb.


To start out, paint all nails black on your right and left hand, except for the pointer on your left hand. Paint your left pointer finger with a sheer, nude color.


Twilight Cover (hands holding the apple)
1. Start off with the sheer, nude color.
2. With nail art brush, paint a small black circle at the top of your nail. Paint two diagonal lines connecting from the circle to the base of your nail.
3. Fill in the triangle created by the two lines. Then, paint another two diagonal lines in black, parallel to the first but coming from the middle of the apple instead of the top.
4. Fill in the the circle with a red polish. Fill in the remaining two bare spots with black, as well. 
5. Add detail to the design. I didn't have an opaque, pale skin colored polish, so i mixed together the sheer polish with a little bit of white. I filled in the two "arms" with this color. I also added little bits o black with a detail brush to shade the hands and arms, and the base of the Apple. I also added a little bit of white to highlight the apple. 


New Moon (ruffled red and white tulip)
1. Using small strokes and a nail art brush, start to paint the flower design. Use the cover art as a reference, and follow the ruffled shape. 
2. Again, with the nail art brush and small strokes, add the red detailing to the flower. Stipple the color onto the edges of the petals, ass well as the more detailed lines on the other petals, just like on the cover art. Also, paint the red drop coming from the flower. 
3. Using a green polish with a striper brush, paint on the stem coming from the flower and connecting it to the base of your nail. 


Eclipse (torn red ribbon)
1. Using a nail art brush and red polish, start to draw the red ribbon. Leaving the space where the ribbon is torn and where it folds. 
2. Then, add detail to the ribbon with black for shadows, folds, and rips. Use white to add highlights. Go over the black and white with more red, then repeat and go back with the black and red until you get the detail as close to the cover as you can. 


Breaking Dawn (chess piece)
The Breaking Dawn cover has a white chess piece in the center, a red chess piece in the back, and a checkered chess board backdrop. To simplify the design I just painted on one white chess piece. 
1. I started out by painting a straight vertical white line on my nail. Then made the bottom of the line wider, into more of a triangle shape. I also made one horizontal line at the top of the line to start out the top of the chess piece. 

2. I aded more lines coming from the top of the line to create the look of a chess piece. 


For my thumbs I put the breaking dawn release date. I painted on the "11.18.11" by carefully painting with a white striper brush for the 1's, and a nail art brush for the 8 and the dots. If your 1's come out too think, don't worry, just go over it with black in between the lines. 


For the remaining fingers on my right hand I wrote out "twilight". I put the "T" on my pinky, "wil" on my ring finger, "ig" on my middle finger, and "ht" on my pointer". (this part isn't that difficult to do, but if you mess up like I did don't worry. I, by accident, managed to make the "h" backwards. To fix it i just went over the white line on the wrong side with black, and re drew it in the right place)
(he pictures showing the mirror image of the letters)


Sunday, October 30, 2011

Cheetah Print Eye Makeup

This is a fun way to do an easy makeup look for halloween, and a little different then just doing a cat eye with the ears.

1. Apply a gold eyeshadow all over your lid.
2. Using liquid or gel eyeliner create a winged, cat eye on your upper lash line. The easiest way to do this is start at the middle of your lashes and work out to the corner. Then go back and fill in with a thing line from the inner corner to the middle. Then to do the wing, follow your lower lash line and wing it up. then connect the line to your line on the lash line. Fill in the little triangle you made. 
3. With the eyeliner, create small little c shapes and little half circles, on your crease towards the outer part of your eye.
4. Fill in the shapes with a small brush and a gold eyeshadow. I found it was easier to use a cream eyeshadow.
5. If you want, use a gold glitter eyeliner on your eyelid and on the print and liner for added shimmer. 
6. Finish up with two coats of mascara. 


To get the full cat effect, add ears and cheetah print clothes. To finish up the makeup use the liner to make whiskers on your face and fill in the black nose. I also chose to use a gold pigment to go over my lips. 

Saturday, October 29, 2011

Quick Fix For Oily Hair: Tresemmé Dry Shampoo

Product:Tresemmé Fresh Start dry shampoo


It's the perfect product for second or third day hair. It's not good to wash your hair every day, because you wash out too many of the essential oily that need to get from your scalp to the rest of your hair. Usually I can withstand a day in between washes, but sometimes when I wake up my scalp is too oily and my hair is really flat. Dry shampoo is the perfect fix. It's really fast and exremely effective.

Process: You just have to lift up sections of your hair around your crown and the front of your head, and shake the bottle and spray into the roots. Shake the bottle before everytime you spray. Let the product sit in your hair for a a minute or tow. Then you can rub it into your scalp and brush through; you can style it however you want from there.

Results: Your hair is left with volume, and not looking oily. Your hair looks as if it was just washed, without having too wash it too often or having to wait for it to dry.

Overall: This product in no way can replace your regular shampoo. This product really is amazing for the price; it's the perfect drugstore option among all the expensive, salon brands. The nozzle tends to clog up and won't dispense anymore product. When this happens, you run the nozzle under hot water for a minute. After that it works perfectly fine again.

Monday, October 24, 2011

Zipper Nail Design

This design is really quick to do, and you don't need a lot of colors.

1. Paint all the nails with one or two coats of black nail polish or another base color, until opaque.


2. Using a small paint brush or nail art brush, paint the "zipper" on using a white or silver nail polish. Make small dashed lines going back and forth on opposite sides to create the zipper. On another nail, start off the same way, but then mid way through the nail separate the two sides of the sipper with diagonal lines to create an opened zipper effect. 

3. Fill in the triangle at the tip of the nail, the open part of the zipper, with a color of your choice, with a nail art brush or very carefully with a regular nail polish brush applicator. 

4. You can do this design on as many nail as you want. I chose to do a closed zipper on my ring finger and open on my pointer on my left hand, and the reverse on my right hand. You can finish off the look with a topcoat to protect your design. 

Wednesday, October 5, 2011

Penguin Nail Design

This is a really easy, quick design perfect for the colder months.

1. First apply one to two coats of a black nail polish, until it is an opaque black color. Clean up any smudges on the edges of the nail with a Q-tip dipped into some nail polish remover. 

2. With a white nail polish carefully make a small, rounded half circle shape on the tip of each nail. The half circle/ovals should be slightly more vertical then they are wide. 

3. Drop some white nail polish onto an index card. Using a toothpick make two small dots above the white rounded tip. These are going to end up being the eyes. Make sure the dots aren't to far apart, otherwise the penguins end up looking a little bit crazy and hypnotized! 

4. To finish off the eyes, wait for the white dots do dry. Then add a smaller black dot (more towards the bottom otherwise they can look a little hypnotized again if they're too much int eh center). Add another even smaller white dot again onto the black. 

5. Using an orangey yellow (or a yellow-gold which is what I used because I didn't have a yellow/orange) make little half circles at the ends of the white part. Also, using a nail art brush, make a small triangle with the point towards the white and the straight edge below the eyes, to create the beak. 

6. Wait for all the polish to dry, add a top coat, and your done! 


Friday, September 30, 2011

Cupcake Nails

I got inspired to try out this look from a picture on pinterest. The design is really cute and easy.

1. Apply one or two coats of a nails polish on all of your nails. I used Sinful Color's Oasis. 

2. After your nails are completely dry, apply a light pink tip on your ring finger. 

3. While you wait for the pink tip to dry, add white globs of "icing" onto the tips of the other nails. To do this carefully make circular tips on the nail and making uneven curves to create the look of icing on a cupcake. After the pink tip is dry, add vertical stripes using a a darker color with a nail art brush or toothpick, onto the pink tip. 

4. Drop some white nail polish onto an index card. Using a nail art brush, or an old eyeliner brush, carefully create a half circle, mound shape above the pink tip on the ring finger. Fill in the half circle up to the pink tip. Then using the tip of the brush and a small amount on polish, carefully drag the polish down over the pink tip, to make the illusion that the icing is falling over. 

5. Drop small amounts of pastel colors onto the index card. Using a toothpick, pick u the colors and create dots on the white "icing" on the nails. This will make it look like little sprinkles, and add more color to the design. Add a larger red dot on top of the "icing" on the ring finger, to look like a cherry. For this dot I used the back of the nail art brush. 

6. Wait for the nails to be completely dry, and add a top coat. Make sure the nails are completely dry because you don't want all of the colors to blend together. 

Tuesday, September 13, 2011

Get the Look: Rachel Zoe

Rachel Zoe is one of the most important names in the fashion world, but not only is her style breathtaking, but her modern, effortless beauty look is simple yet makes such a strong statement. 


Hair: Rachel's Tousled Waves
1. Start off with day 2 hair, so the style holds up better. 
2. Spritz a heat protectant all over the hair, concentrating on the ends. Brush it through the hair. split hair int a middle part. 
4. Once the hair is completely dry from the protectant and brushed through, pin up sections so that you can curl one section at a time. 
5. Using a 1 1/2 inch curling iron, wrap the 1/2 inch sections of hair around the barrel, facing away from your face, and hold it for about 10 seconds. Drop it into the palm of your hand and let it set for a second. curl the rest of the hair. Use smaller sections and hold them for longer round the front of the face sot hat the pieces framing the face are more defined. 
6. Finish off the hair by spraying hairspray into the palm of your hand and scrunching up the hair a little bit. this will tousle the curls, but in a beach-y, piece-y way, rather than a soft look. 


Makeup: Rachel's Modern, Natural Look
1. Start off with a perfect base. Using your favorite foundation and concealer cover your skin until you have a medium to full coverage. don't set the makeup with powder because Rachel always has a dewy look. 
2. Highlight cheekbones and use a bronzer on the cheeks but not to contour the cheekbones, but blend it on top of your cheekbones. 
3. Put a cream eyeshadow on your eyelids in a nude, shimmery color. Line the inner rims of the eyes with black eyeliner. 
4. Curl lashes and apply two coats of a dark black mascara and the upper lashes, and one coat on the bottom lashes. 
5. To get Rachel's typical deep, maroon, red lips, you'll need to apply several coats. Start off with lining the lips with a shade deeper then your lips, and smudge it onto the middle of the lips as well. Apply a red lipstick on the lips, then blot with a tissue. Apply the color again and blot off more. This is gonna create a strong, stained, matte look. 


Recommended Products: 
Conair 1 1/2 inch curling iron 
Strong Sexy Hair long hold hairspray
Benefit High Beam highlighter
Urban Decay 24/7 eyeliner in Zero


Put on your biggest, darkest sunglasses to complete the Rachel Zoe look. 


Saturday, August 27, 2011

NARS EXPRESS YOURSELF: THE NARSissists: Look 4: Rebecca Klar

NARS EXPRESS YOURSELF: THE NARSissists: Look 4: Rebecca Klar


I entered the NARS Makeup Your Mind Contest. It would mean so much if anyone voted for my entry!!


To get this look I used similar colors to the ones used on the model, but with different products. First I used a Revlon cream shadow palette and put a creamy white color on the inner half of my lid and the brow bone,  and a brown matte shade on the outer half and into the crease. Then i used the green from the Stila Fabulous in Fiji palette. Then i missed in some of Urban Decay's smog and darkhorse to deepen the crease. I ket adding more of the green, and more of Smog and Darkhorse to add depth to the crease. I blended out the colors until i got the desired look. I also blended the crease color in farther towards the bridge of my nose, as the model had in Nars' picture. Then i added Urban Decay's Virgin as a browbone highlight. I took a bright, shimmery, lime green to the inner corner and below the lash line on the inner third. I added the green, smog, and darkhorse under the lash lien as well. I liner the inner rim with Urban Decay's 24/7 glide on pencil in zero; curled my lashes and applied two coats of Maybelline One-byOne.

The lips and cheeks were pretty neutral. I used a little bit of the NYC sunny bronzer on the cheeks. For the lips I used Revlon Pink Sugar lipstick.


Don't forget to vote for my look!!

Thursday, August 25, 2011

Back To School Fashion: Pairing Basics

Instead of buying more clothes to create new looks, pair up the basics you already have with different pieces. Accessories can change the whole look.

Look #1: Floral dress, layered with a black cardigan, scarf draped over the shoulders, and a belt going around the waist over the whole outfit.


Look #2: Floral tube dress, with a black lace shirt under it; gold bracelet.


Look #3: Crop top over black lace shirt, with light wash slouch cuffed jeans; feather earrings.